fbpx

User Guide

Userguide AAL-Band 2.0

1. Introduction

To download the software, userguide and datasheet go to this URL:
https://www.bioxgroup.dk/downloads/

2.1 Placement of the AAL-Band

The AAL-Band should be placed on the forearm as shown on Figure 2.1

AAL-Band arm
Figure 2.1: Placement of the AAL-Band.

2.2 Interactions with the AAL-Band

The AAL-Band has two buttons, on/reset and off, and a light that indicates the status of the band, this is shown on Figure 2.2.

AAL-band
Figure 2.2: Picture of the AAL-Band.

When the on button is pressed the light blinks red and green two times and then it is on. When there is no light it indicates that the band is turned off. The on button can also be used to reset the connection by pressing it again after it has been turned on. This will result in the light beeing half green and half red and blinking twice. When the off button is pressed the light will blink red five times before turning off.

How to get started

The product contains of the AAL-Band and an application. To begin using the product for gesture recognition you must go through this step by step guide, where all parts of the interaction will be covered.

3.1 Setup

After the AAL-Band has been placed correctly on the arm it must be connected to the application and a calibration must be conducted, this is the setup.

3.1.1 Connection

Step 1: 
Turn on ALL-Band by pressing the on the button, as illustrated on Figure 2.2.
Step 2:
Turn on Bluetooth on your computer and search for the AAL-Band by pressing “Add Bluetooth or another device”, as seen on Figure 3.1. If you need more information on how to connect to bluetooth go to URL: https://support.microsoft.com/en-us/help/15290/windows-connect-blu etooth-device

Bloetooth
Figure 3.1: Connecting to Bluetooth.

Step 3:
Open the application, the startscreen can be seen on Figure 3.2.

AAL-Band User guide
Figure 3.2: Start screen of the application.

Step 4:
Press the “Connect” button on the start screen. Under the button a light will indicate whether the connection is succesful. On figure 3.3a the light is yellow, so the band is trying to connect. When the light turns green, as seen on Figure 3.3b, the connection is completed and then the next step of the setup, calibration, can begin. If it is not possible to connect, the light will turn red and report that an error has occurred. If red, try to reset the AAL-Band by pressing the on button or reset your Bluetooth.

(a) AAL-Band is not yet connected.
(b) AAL-Band is connected.

Figure 3.3: Connection of AAL-Band

3.1.2 Calibration

Now that the AAL-Band is connected to the application it is possible to calibrate the band. A calibration is needed to test out the muscle activities and arm motions.
Step 1: 
Make a fist with the hand that you have placed the AAL-Band on.

Step 2:
Press the button “Calibrate”, see Figure 3.4. The calibration will take three seconds and during the calibration the light under the button will be yellow. When the light turns green it means that the calibration is done and you can relax your hand.

AAL-Band User Guide
Figure 3.4: Calibration of AAL-Band.

Step 3:
If the calibration was faulty you can press the button “Resetcalibration”, see Figure 3.5, and do a new calibration by pressing the button “Calibrate” again.

Figure 3.5: Calibrated AAL-Band, that can be reset.

3.2 Data Recording

The setup has been finished and now you can begin to record data for the different gestures and train the model.

Step 1:
Go to the “Record” tab, the data recording menu can be seen on Figure 3.6.

Record Data
Figure 3.6 Data recording menu.

Step 2:
If you want to save your data press the tab “file” and choose “save session”. This will save all data. The output files are described in detail in Section 4.2.

Step 3:
Choose for how many seconds you want to record each gesture by setting the “Rec time”, which on Figure 3.6 is set to 5 seconds.

Step 4:
Choose a gesture to record. The first recording in the session have to be at least two of the gestures. After this, gestures can be chosen individually to provide more data for one or more gestures. To add or remove gestures, see Section 4.3.

Step 5:
Press the button “Start recording”.

Step 6:
Perform the gestures shown on the image to the right, see Figure 3.7 where the gesture “Flexion_vertical” is shown. The loading bar tells you how long you have to hold the gesture before going to the next gesture. The gestures will be gone through in the order from top to bottom. Make sure that you hold your arm in the same position for each gesture.

Figure 3.7 Gesture Recording
Figure 3.7 The gestures have been chosen and recording is started.

Step 7:
If a mistake has occurred during the recording of the gestures it is possible to reset the data by pressing the button “Reset data” and start a
new recording. This will clear out all recorded data and erase models if they are trained.

Step 8:
When you are satisfied with your recorded data you can train the model with your recorded data.

Step 9:
Configure what type of data you want to train your model with, FMG, Gravity, Angular velocity, Linear acceleration or Euler Angles.

Step 10:
Press the button “Train model”. The light under the button will change from red to green when the model has been trained, which can be seen on Figure 3.8.

3.8 Gestures have been recorded and the model is trained
3.8 Gestures have been recorded and the model is trained.

Step 11:
Record gestures more than once to get better performance in the testing.

3.3 Testing

By training the model on the recorded data it can now recognise the gestures and a test of the models performance can be conducted.

Step 1:
Go to the “Testing” tab, see Figure3.9.

AAL-Band User Guide
Figure 3.9: Testing menu.

Step 2:  
The Support Vector Machine is the chosen classifier.

Step 3:
Again, if you want to save your data press the tab “file” and choose “save session”.

Step 4:
Press the button “Start”.

Step 5:
Perform different gestures. An image to the right will display the prediction, see Figure 3.10 where the gesture “Flexion_vertical” is displayed.

AAL-Band User Guide
Figure 3.10: Recognition of the gesture "Flexion_vertical" during training.

Step 6:
Press the button “Stop” when you have collected the wanted data.

Step 7:
If the classifier has difficulties with predicting a certain gesture, record more data for it and retrain the model.

Step 8:
An extra option in relation to testing is to apply the gestures to a Lego Mindstorms EV3, if you own one. However, this is not yet implemented. The intention is that you can control the device with the AAL-Band and in that way see how well it performs.

Miscellaneous

4.1 Function under development

In the application there is the option to press “View” in the upper right corner. Then you can press “Output graph”, however the graph that will appear is simply random generated data, as seen on Figure 4.1.

Figure 4.1: How the output graph currently looks like.

The intention is that it should be possible to get a graphical representation of the data during recording and training. This will be implemented soon, but for now it does not have any function.

4.2 Output files

The output files for raw and RMS data are saved as .csv files, one for each gesture. The output files consist of 21 columns and an overview over what type of measurement these columns consist of is seen in Table 4.1. Other dumped files’ format are dependent on the procedure of recording and training.

Table 4.1 Description of output datafiles

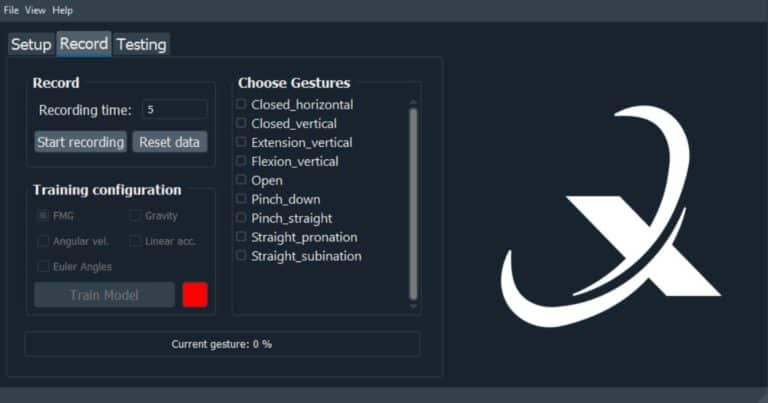
Depending on the progress of the pipeline, 5 different dumps are executed:

• Raw data.
• Calculated root mean square of data windows.
• Input for support vector machine, X and Y.
• Classifier model. (Saved with pickle as .sav).
• Testing data.

The name of the saved files can be explained like this:
[Date(YYYY_MM_DD)]_[Time(HHMM)]_[Data type]_[Gesture].[extension]

4.3 Adding or removing gestures

Step by step guide on how to remove gestures in the application:

Step 1:  
Go to the folder on your computer where you have installed the application.

Step 2:
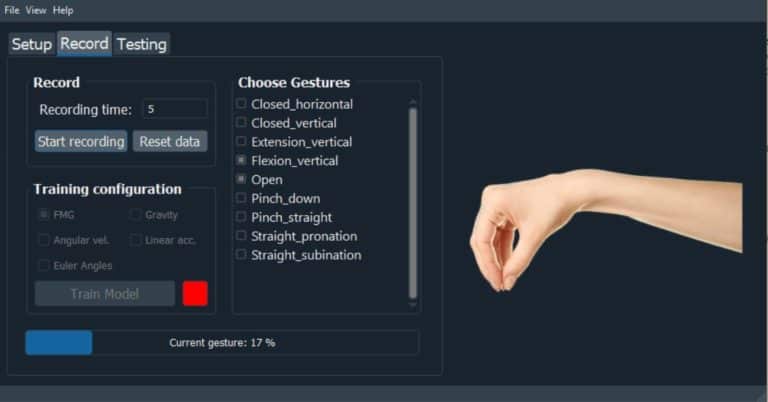
Choose the folder “hand_pic”. Here are the images of the saved gestures.

Step 3:
Adding: If you want to add a gesture you must copy an image into the folder. It is important that you name the image accordingly to what gesture it represents.

Step 4:
Removing: If you want to remove a gesture simply delete the image of the gesture that you no longer want to be included.

4.4 Other software for collecting data

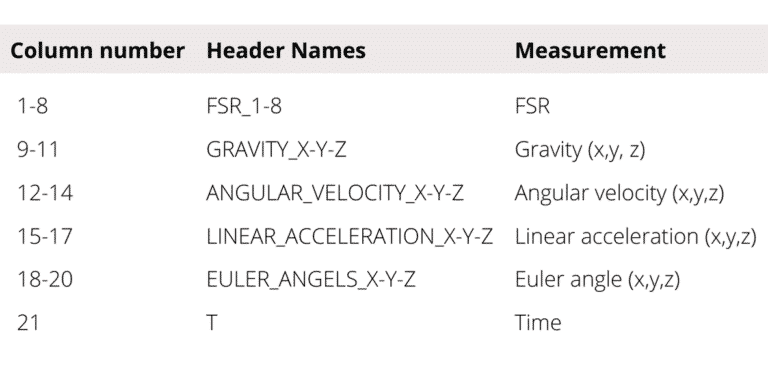
If the purpose of using the AAL-Band is simply to collect and plot data, there can be used the software either for MATLAB or Python to achieve this. The only thing that must be changed is for how long you want to collect data. In the MATLAB code this is done by changing the variable “time_to_record” which is in seconds. For the Python code the variable “sampletime” is changed. Both codes achieve the same, which is collecting the measurements of FSR, gravity, angular velocity, linear acceleration, Euler angels and time.

The software can be downloaded:
https://www.bioxgroup.dk/downloads/